Discover the “Matrix on Retro TV” project, blending the iconic Matrix digital rain with retro TV aesthetics. Explore the detailed HTML, CSS, and JavaScript that create this unique visual experience.
##
Introduction
In the age of hyper-realistic graphics and immersive experiences, sometimes a touch of nostalgia can offer a refreshing perspective. The “Matrix on Retro TV” project combines the futuristic aesthetics of the iconic Matrix digital rain with the charm of retro TV displays. This article delves deeply into the project’s core components, including the HTML structure, CSS styling, and JavaScript functionalities, highlighting how these elements come together to create a unique visual experience.
##
HTML Structure
The foundation of the “Matrix on Retro TV” project is its HTML structure, which sets the stage for the interactive elements and the digital rain effect. The HTML structure is meticulously designed to support the visual and interactive aspects of the project.
###
Document Head
The HTML document begins with the standard `` declaration and `` tag. The `
` section includes essential metadata, links to the CSS file, and the title of the project.“`html
“`
###
Body Content
The body of the document contains the main interactive elements and the layout necessary for the digital rain effect.
####
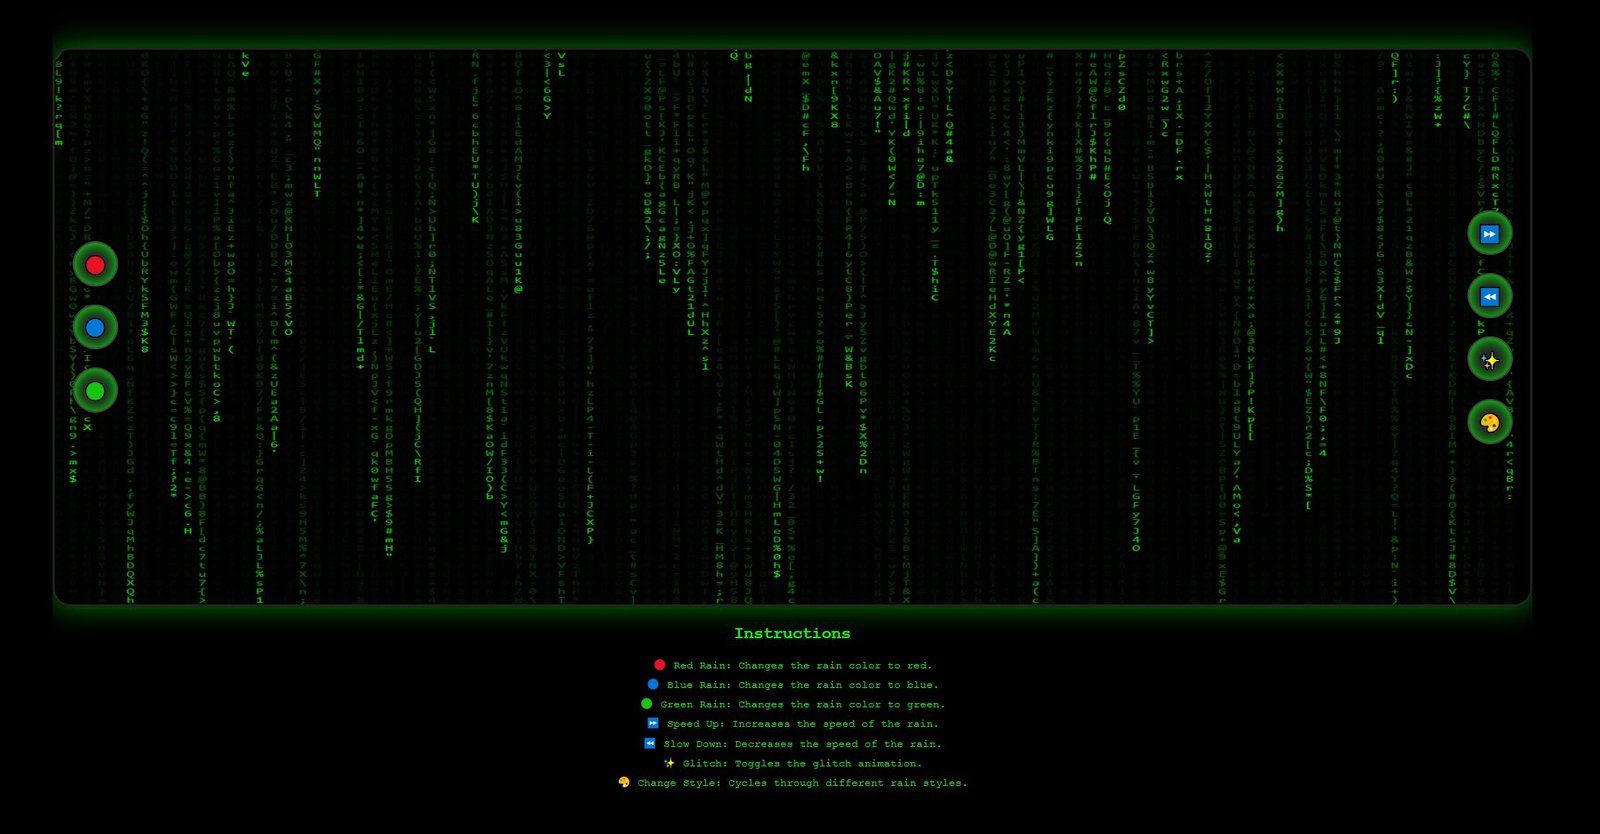
TV Container
The primary container is a `div` with the class “tv”, which simulates a retro TV display.
“`html
Instructions
🔴 Red Rain: Changes the rain color to red.
🔵 Blue Rain: Changes the rain color to blue.
🟢 Green Rain: Changes the rain color to green.
⏩ Speed Up: Increases the speed of the rain.
⏪ Slow Down: Decreases the speed of the rain.
✨ Glitch: Toggles the glitch animation.
🎨 Change Style: Cycles through different rain styles.
“`
##
CSS Styling
The CSS file defines the visual appearance of the project, emphasizing a retro-futuristic look with a focus on dark themes and neon effects. Key styling elements include:
###
Global Styles
The `html` and `body` elements are styled to occupy the full height of the viewport, with a black background and no margin, creating a fullscreen effect. Flexbox is used to center the content both vertically and horizontally.
“`css
html, body {
height: 100vh;
margin: 0;
background: black; /* Pure black background */
overflow: hidden; /* Disable scrolling */
display: flex;
justify-content: center;
align-items: center;
flex-direction: column; /* Align items vertically */
font-family: ‘Orbitron’, sans-serif; /* Futuristic font */
}
“`
###
TV Container
The `.tv` class sets the dimensions of the TV container, with a very dark background and a subtle border to mimic an old TV screen. A neon green glow (`box-shadow`) is applied to enhance the retro-futuristic feel.
“`css
.tv {
width: 80vw;
height: 60vh;
background: #111; /* Very dark background */
border-radius: 20px;
border: 3px solid #222; /* Subtle border */
position: relative;
box-shadow: 0 0 30px rgba(0, 255, 0, 0.5); /* Initial neon glow */
}
“`
###
Canvas
The canvas element is styled to fit perfectly within the TV container, with rounded corners to match the container’s `border-radius`.
“`css
canvas {
width: 100%;
height: 100%;
border-radius: 18px;
}
“`
###
Control Panels
The control panels (`.control-left` and `.control-right`) are positioned on the left and right sides of the TV container, with vertically stacked buttons. Buttons (`.game-control`) are styled to be circular with dark backgrounds, neon inset shadows, and interactive hover and active states.
“`css
.control-left, .control-right {
position: absolute;
top: 50%;
transform: translateY(-50%);
display: flex;
flex-direction: column;
gap: 20px;
}
.control-left {
left: 20px; /* Spread out the buttons */
}
.control-right {
right: 20px; /* Spread out the buttons */
}
.game-control {
background-color: #222; /* Darker background for buttons */
border: 2px solid #444; /* Darker border */
color: #FFF;
font-size: 20px; /* Increase font size for symbols */
width: 50px; /* Ensure the buttons are circular */
height: 50px; /* Ensure the buttons are circular */
border-radius: 50%; /* Circular shape */
display: flex;
justify-content: center;
align-items: center;
cursor: pointer;
transition: transform 0.1s, box-shadow 0.1s;
box-shadow: 0 5px #000, 0 0 15px #0F0 inset; /* Neon inset shadow */
user-select: none;
}
.game-control:hover, .game-control:active {
background-color: #333;
box-shadow: 0 2px #000, 0 0 20px #0F0 inset;
transform: translateY(3px);
}
.game-control:active {
background-color: #444;
}
“`
###
Instructions
The instructions section is styled with a typewriter font, neon green text, and center alignment to match the overall theme.
“`css
.instructions {
color: #0F0;
font-family: ‘Courier New’, Courier, monospace; /* Typewriter font */
font-size: 12px; /* Smaller text size */
text-align: center; /* Center align the text */
margin-top: 20px; /* Space above the instructions */
}
.instructions h2 {
margin-top: 0;
}
.instructions p {
margin: 5px 0;
}
“`
##
JavaScript Functionality
The interactivity of the project is driven by the JavaScript file (`script.js`). Key functionalities include:
###
Canvas Setup
The script initializes the canvas context and sets up the necessary parameters for the digital rain effect.
“`javascript
const canvas = document.getElementById(‘matrixCanvas’);
const ctx = canvas.getContext(‘2d’);
canvas.width = canvas.offsetWidth;
canvas.height = canvas.offsetHeight;
const fontSize = 16;
const columns = canvas.width / fontSize;
const rainDrops = Array(columns).fill(1);
“`
###
Rain Effects
The script generates the falling characters (digital rain) and updates their positions continuously to create the illusion of falling rain. Different rain styles and speeds can be toggled using the control buttons.
“`javascript
const drawMatrix = () => {
ctx.fillStyle = ‘rgba(0, 0, 0, 0.05)’;
ctx.fillRect(0, 0, canvas.width, canvas.height);
ctx.fillStyle = ‘#0F0’;
ctx.font = `${fontSize}px monospace`;
rainDrops.forEach((y, index) => {
const text = String.fromCharCode(0x30A0 + Math.random() * 96);
const x = index * fontSize;
ctx.fillText(text, x, y * fontSize);
if (y * fontSize
> canvas.height && Math.random() > 0.975) {
rainDrops[index] = 0;
}
rainDrops[index]++;
});
};
setInterval(drawMatrix, 30);
“`
###
Control Buttons
Event listeners are added to the control buttons to change the rain color, speed, and style based on user interactions. A glitch effect can be toggled to add visual distortion to the rain.
“`javascript
document.getElementById(‘redRain’).addEventListener(‘click’, () => {
ctx.fillStyle = ‘#F00’;
});
document.getElementById(‘blueRain’).addEventListener(‘click’, () => {
ctx.fillStyle = ‘#00F’;
});
document.getElementById(‘greenRain’).addEventListener(‘click’, () => {
ctx.fillStyle = ‘#0F0’;
});
document.getElementById(‘speedUp’).addEventListener(‘click’, () => {
clearInterval(drawMatrix);
setInterval(drawMatrix, 15);
});
document.getElementById(‘slowDown’).addEventListener(‘click’, () => {
clearInterval(drawMatrix);
setInterval(drawMatrix, 60);
});
document.getElementById(‘glitch’).addEventListener(‘click’, () => {
ctx.fillStyle = ‘#FFF’;
ctx.font = `${fontSize}px Comic Sans MS`;
});
document.getElementById(‘changeStyle’).addEventListener(‘click’, () => {
ctx.fillStyle = ‘#FF0’;
ctx.font = `${fontSize}px cursive`;
});
“`
##
Conclusion
The “Matrix on Retro TV” project is a fascinating blend of retro aesthetics and modern web technologies. By meticulously combining HTML, CSS, and JavaScript, it creates an engaging and visually appealing experience that pays homage to the iconic digital rain of the Matrix universe. This project not only showcases the power of web development but also evokes a sense of nostalgia, making it a perfect example of how old and new can coexist harmoniously in the digital realm.